RV-9A: Ailerons - 5/3/2007
Home Previous Entry Next Entry Back |
Share on:

|
|
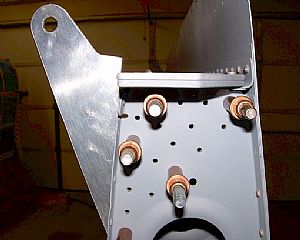 Starting drilling and clecoing the flap brackets on Starting drilling and clecoing the flap brackets on
Heading scratching time again. This first part was easy, clecoing on the big flap bracket. The holes in the end rib were predrilled, not so on the other 2 flap brackets. These ribs have 2 pilots holes only, to establish the initial position of the flap bracket. Now to figure how to position those small W-925B and W-925C angles.
|
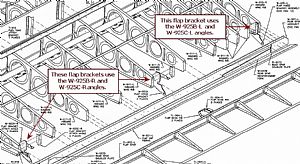 Getting a mental picture of the L's and R's on the angle pieces Getting a mental picture of the L's and R's on the angle pieces
The answer to which angle pieces go where is a little vague on the plans, but it�s there. I remembered that when I organized the ribs for the wing that the "L's" and "R's" marked on the ribs didn�t mean Left and Right wing, they meant which direction the flanged on each piece was pointing. Same thing here. So I figured out that the W-925B-R and W-925C-R angles went on the 2 most outboard flap brackets, and the W-925B-L and W-925C-L angles went on the end inboard flap brackets. All of this is reversed on the right wing. Click on the image on the left to get the whole picture.
|
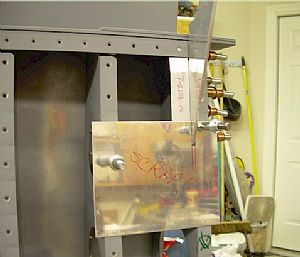 Fitting the W-925B angles Fitting the W-925B angles
This angle piece has to be positioned to where it is flush with the bottom of the other ribs in the wing. The top of the bracket is easy, it just fits by laying on the inside of the rear spar, AND the top hole has to be countersinked to allow the dimple in the rear spar to go into the countersinked hole in the angle W-925 piece. I drilled this hole first and took the assembly apart to countersink that top hole in the W-925 angle, then put the whole assembly back onto the wing. The problem now is other end, where you need the angle side to be flush with the other ribs. I grabbed a piece of scrap from the scrap sheet pile from the tail kit and cut a slit in it with the band saw and drilled to holes on each side of the scrap piece and clecoed it to the ribs. This gives me a "go-by" for making the W-925B angle fit into the right position. Once I got the holes drilled, I simply removed the scrap piece and use it for the next flap bracket.
|
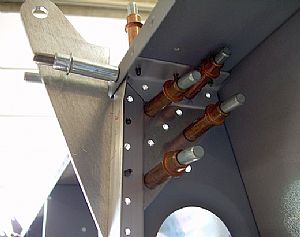 Finished drilling the holes in all the flap brackets Finished drilling the holes in all the flap brackets
Here's a pic of one of the 2 outboard flap brackets. I used my pneumatic 90 degree angle drill to drill just about all the holes. I got lucky and found about this second hand angle drill from a posting on Vans Air Force.
|
Home Previous Entry Next Entry Back
|


