RV-9A: Right Elevator - 12/6/2005
Home Previous Entry Next Entry Back |
Share on:

|
|
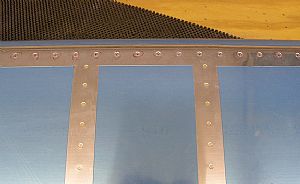
 Riveted the counterbalance assembly to the front spar Riveted the counterbalance assembly to the front spar
I used my pneumatic rivet squeezer to put in the outside rivets that attached the counterbalance ribs to the main spar. But the inside rivets were a little trickier. I used my hand squeezer with the 4" yoke and put some washers on one of the dimple dies so the yoke would not hit the spar flange during the "squeeze".
|
 Pop-riveted the elevator bottom skin to the main spar Pop-riveted the elevator bottom skin to the main spar
I used regular rivets where I could using the opening where the elevator attaches to the horizontal stabilizer. Everywhere else required using the 1/8" pop-rivets. Yeah, their ugly but they're on the bottom of the elevator. Can't see em' from my house.
|
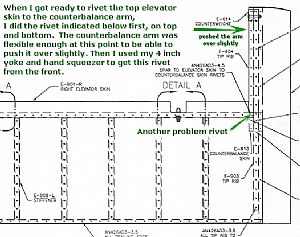 Getting the problem rivet Getting the problem rivet
When I got ready to rivet the elevator skin to the counterbalance arm, I did the problem rivet first, which is shown in the photo (click the picture for a blownup view). At this point, since the counterbalance arm is only riveted to the spar, I was able to push the front of the counterbalance over slightly away from the main spar, pivoting it on the attachment point. Then I was able to get my 4 inch yoke with the hand squeezer in between the counterbalance arm and the rounded front edge of the elevator skin to get to this rivet. After I got both rivets in on top and bottom, then I swung the arm back into position and did the rest of the skin rivets.
|
Home Previous Entry Next Entry Back
|


